EC2 Auto Scaling Group & Load Balancer

In the previous medium post, I showed you how to migrate a server to EC2 instance using your own AMI from AWS CLI so that you can host your website in the cloud. In this article, I am going to show you how to move your whole network infrastructure into the cloud by creating custom VPC and network environment that is highly available with high fault tolerance by using Auto Scaling group with Load balancer.
What is AWS EC2 Auto Scaling Group?
An Amazon Elastic Compute Cloud (Amazon EC2) Auto Scaling Group, often referred to as an “Auto Scaling Group” or simply “ASG,” is a fundamental component of AWS (Amazon Web Services) that helps you automatically manage and maintain a group of EC2 instances to ensure that your application is both highly available and cost-effective. On premise servers will run at full capacity all the time, which costs a lot of money. AWS Auto Scaling Group allows you to increase and decrease the number of instances based on demand. The number of instances will go up during the day when the traffic is high and will go down during the night when the traffic is low.
What is AWS Load Balancer?
An AWS Application Load Balancer (ALB) is a fully-managed load balancing service provided by Amazon Web Services (AWS). It operates at the application layer (Layer 7) of the OSI model and is designed to efficiently distribute incoming HTTP and HTTPS traffic to multiple targets, such as Amazon EC2 instances, containers, or Lambda functions, based on various rules and conditions.
Objectives:
- Create A Custom VPC with a CIDR of 10.10.0.0/16
- Create 3 Public subnets with CIDR blocks of 10.10.1.0/24, 10.10.2.0/24, and 10.10.3.0/24
- Create Autoscaling group with a minimum of 2 instances and a maximum of 5 instances
- Create Application Load Balancer using security group
- Create Web server security group that allows inbound traffic from HTTP from the Application Load Balancer.
Why would a company move their entire on-prem network to the cloud?
Scalability: A bank’s infrastructure needs can change rapidly depending on customer demand, market conditions, and other factors. By moving its network to AWS, the bank can take advantage of the cloud’s scalability and easily scale up or down as needed. For example, during periods of high customer demand, the bank can quickly scale its infrastructure to handle increased traffic, and then scale back down during periods of lower demand. This means that the bank can avoid the upfront costs of purchasing and maintaining hardware and only pay for the resources it actually uses.
Reliability: Downtime and service disruptions can be extremely costly for a bank. AWS provides a highly reliable infrastructure with multiple availability zones and automatic failover capabilities. This means that if one availability zone goes down, the bank’s services can automatically failover to another availability zone without any interruption to customers.
AWS also provides monitoring and management tools that can help the bank proactively identify and address potential issues before they impact customers.
Security: Banks are subject to strict regulations and face significant risks related to data breaches and cyber attacks. AWS provides robust security features, including encryption, access controls, and network security, to help protect against these risks. By moving its network to AWS, the bank can take advantage of these security features and improve the security of its infrastructure and customer data.
Cost savings: Maintaining and upgrading on-premises hardware can be expensive and time-consuming. By using AWS, the bank can take advantage of pay-as-you-go pricing and avoid the upfront costs of purchasing and maintaining hardware. This means that the bank can focus its resources on improving its services and offerings, rather than on
managing and maintaining infrastructure.
Flexibility: The banking industry is constantly evolving, and banks need to be able to quickly adapt to changing market conditions and customer needs. Moving its network to AWS gives the bank the flexibility to quickly spin up new instances, test new features, and experiment with different configurations. This can help the bank innovate and respond more quickly to changing market conditions, giving it a competitive advantage.
Let’s get started!
Create VPC
- Go to VPC>Click the orange Create VPC button.
- Name your VPC and enter IPv4 CIDR 10.10.0.0/16.
- Keep the default settings and click Create VPC orange button.

4. Select your VPC>Actions>Edit VPC settings and enable DNS hostname and Save.


Create 3 public subnets Subnets
- Go to VPC>Subnets>Click orange Create VPC button.
- Select your VPC and enter Subnet name, Availability Zone, IPv4 CIDR. Click Add new subnet button and add the second and third public Subnet and then click Create subnet button.
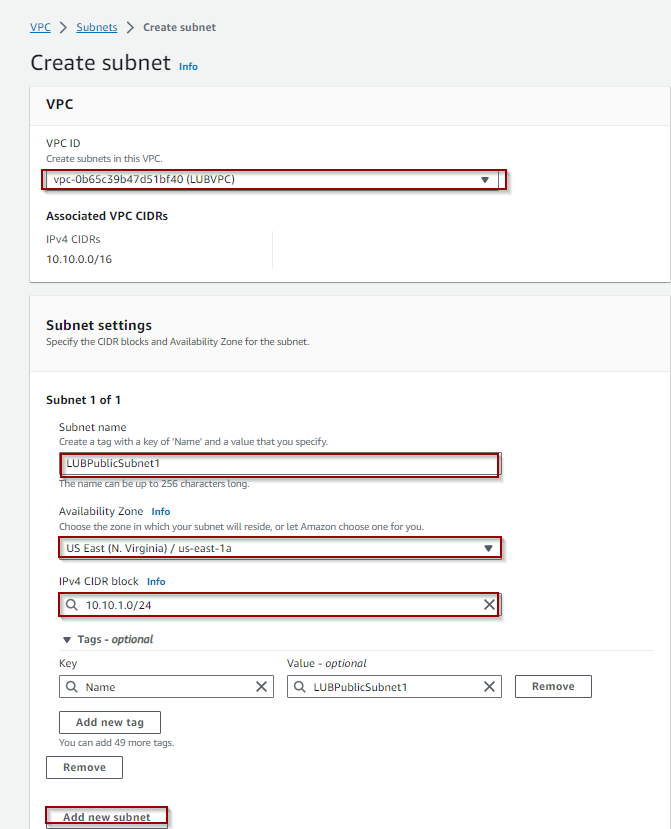


3. Select each subnet>Actions>Edit subnet settings and enable auto-assignment.


4. Each subnet in your VPC must be associated with a route table. Go to VPC> Route tables > your public route table>Subnet associations>Click Edit subnet associations>Add all 3 public subnets.
Create the Internet Gateway
- Go to VPC>Internet gateway>Click Create internet gateway button>Name it>Click Create internet gateway button.

2. Click Actions>Attach to VPC>Attach your VPN>Click Attach internet gateway button.


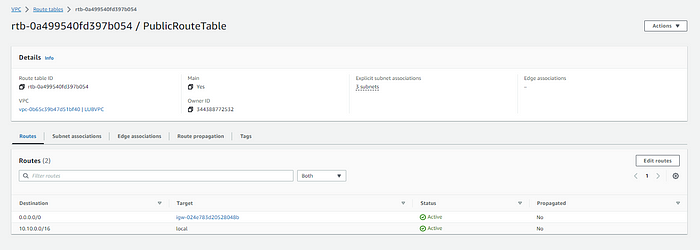
Configure Route Table
- Go to VPC Route Tables and locate your public route table and add the name.

2. Select the PublicRouteTable>Routes tab>Edit routes.

3. Click Add route button and set destination 0.0.0.0/0 and target address to the Internet Gateway.


Create Security Group
- Go to EC2 > Security Group > Create security group.
- Name your security group and add Inbound rules to allow port 22, port 80, and port 443. Click Create security group button.

Create Launch template
- Go to EC2> Launch template> Create launch template.
2. Name your launch template and choose ami and instance type.


3. Add user data below in the Advance details section. Click Create launch template button.
#!/bin/bash
yum update -y
yum install -y httpd
systemctl start httpd
systemctl enable httpd
EC2AZ=$(curl -s http://169.254.169.254/latest/meta-data/placement/availability-zone)
echo '<center><h1>This Amazon EC2 instance is located in Availability Zone: AZID </h1></center>' > /var/www/html/index.txt
sed "s/AZID/$EC2AZ/" /var/www/html/index.txt > /var/www/html/index.html
Create Auto Scaling Group
- Go to EC2>Auto Scaling groups > Create Auto Scaling group.
- Name your auto scaling group and select your launch template and click Next.
- Select your VPC and select all 3 of your public subnets. Click Next.

4. Create Load balancing by selecting Attach to a new load balancer option. Change Load balancer scheme to Internet-facing. Select your VPC and select all 3 public subnets.

5. Create target group.

6. Turn on Health checks.

7. Enable group metrics collection within CloudWatch. Click Next.

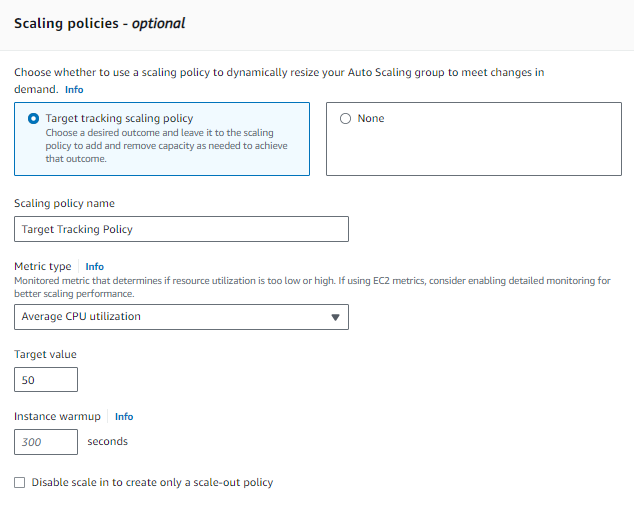
8. Configure group size and scaling policies.

9. Select Target tracking scaling policy to dynamically resize your Auto Scaling group to meet changes in demand.
10. Add notification to SNS topics whenever Amazon EC2 Auto Scaling launches or terminates the EC2 Instances in your Auto Scaling group.

Let’s test!
Go to EC2>Load Balancer and copy the Load Balancer DNS name. Paste it in a new tab. It loads the page from Public subnet a: us-east-1a. Click refresh button. Now click the refresh button. Now the load balancer switched it to public subnet b: us-east-1b. Yay! It worked! Since we set the scaling policy to run two instances, you will see two Availability Zone alternating when you refresh it.


Let’s see if auto scaling policy is working!
Stop LUB1 instance from EC2 Instance. Go to Target Groups and check if Targets health. You will see the LUB1 instance is marked as unhealthy. Now go to EC2 Instance page. Now, you will see another instance is initiating by Auto Scaling Group Policy. Yay! It is working.


In Plain English
Thank you for being a part of our community! Before you go:
- Be sure to clap and follow the writer! 👏
- You can find even more content at PlainEnglish.io 🚀
- Sign up for our free weekly newsletter. 🗞️
- Follow us on Twitter(X), LinkedIn, YouTube, and Discord.

